Focusers and Knife Edges
Focusers
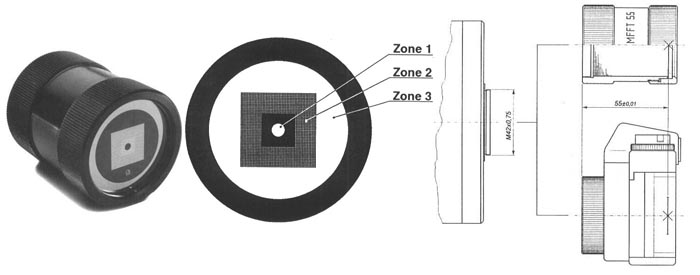
Celestron MFFT-55
For a long time I used the
Celestron MFFT-55 as a knife edge focuser. This device, sold several
years ago, is manufactured by the German optical company, Lichtenknecker.
It comprises of a 54mm diameter tube to which a T-adapter is attached at
one end and a glass plate at the film focal plane 55mm from the front.
Upon this optically flat glass plate has been vacuum deposited an aluminum
grid which can be used as a Ronchi grating. In the center of the
grid is a 20mm area completely filled in. In the center if this filled
area is a 10mm clear circle who's inner edge acts as the knife edge. First center a 3-4 Mv star and attach the MFFT to the
focuser as would a camera. The out of focus star illuminates the Ronchi grid
and central clear area. Rack in/out the focuser watching the grid lines
grow in size as the star comes closer into focus. When a single line
fills the view the star is nearly in exact focus.
Switch to the central circular clear area. Slowly
moving the scope, I prefer DEC, moving the star across this boundary.
Using the knife edge technique of focusing, when a star is out of focus
either in or outside of exact focus the image will move across the view.
When the star nears exact focus the image changes to a gradual shading
entering on one the other sides of the view. When the star is at exact
focus you cannot tell which direction the star enters the field because the
central area gradually brightens without a hint of movement in any direction.
When this occurs, lock down the focuser.
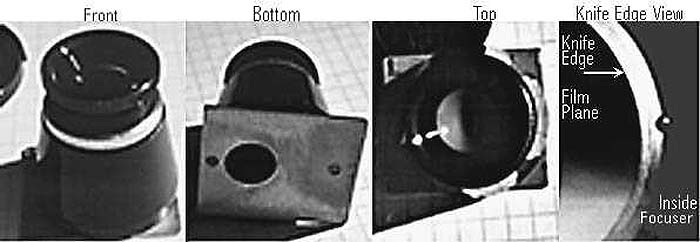
Home Built Focusers A friend made a simple Knife Edge focuser
for me. It's a simple piece of aluminum wide enough to fit between the
film guide rails of the camera. On one edge is a 5/8" section which has
been very finely filed to a very sharp edge, the edge being towards the camera
body. I have been using this off and on and have found this works very
well. ; In fact, I've started testing the Celestron MFFT with this simple
tool. Sometimes I find I've made a mistake with the MFFT. This
tells me that this tool appears to be more exacting than the MFFT, but more
difficult to use because of its size and the need to move the knife edge itself
instead of the telescope.
Variant of "Classic" Knife Edge
My Losmandy GM-100 mount has 36" legs,
using a refractor places the camera body very low, sometimes very very low.
Often I find myself in a position where it is very difficult to focus with
either Celestron's MFFT or a "Classic" knife edge focuser comfortably long
enough to do a good job. I thought it would be nice to have an eyepiece
attached to a knife edge to magnify the star image while focusing, magnifying
the image might make the job a little easier. After thinking on this and
talking with a friend we created just such a device. There was a surprising
bonus.
I used a 'Edmund Scientific
Opaque Base Magnifier'
because the 0.68" (17.2 mm) Kellner lens has been corrected for curvature
known as pin cushion. The latest Edmund's 1998 "Catalog for Science and
Engineering Enthusiasts", C989B, pg. 24 lists the magnifier I used.
There are three powers available, 6x #V30-019 @ $45, 9x #V30-056 @ $49
and the one I used is 12x #V30-054 @ $51. All magnifiers have a locking
diopter adjuster but no reticle, the overall diameter of the black extension
tube is slightly wider than the film guide rails on a OM-1 camera back.
We then made a modified knife edge to attach to the
magnifier. The knife edge was modified from a straight edge to that of the
inside of a countersunk 5/8" diameter hole in an aluminum plate. This hole
was beveled and smoothed, the edge at the film plane is the knife edge and
the bevel is facing the magnifier. One edge of the hole was placed near
the center of the magnifier's field of view. One word of caution
here, be sure to flatten the film surface after drilling and countersinking
the knife edge hole. If you don't there is a potential of a raised edge
and stars when focused will be 'inside' of focus of the film plane. The
knife edge's hole must be at the same level as the film plane rails on the
camera body. The modified knife edge was then sized to fit the film rails
and attached to the magnifier. The knife edge plate's thickness provides
enough clearance for the magnifier's outside diameter to be just above the
film guide rails.
The magnifier is then focused to the exact edge of
the knife edge. Here's a neat thing, because you are focusing on the edge
of metal which will be the knife edge the magnifier can be focused and
locked into position with the diopter adjuster in daylight or any bright
light! Just reflect light off the countersink surface and focus on the very
edge of the knife edge which is the film plane. The smoother the countersink
surface is, the easier the focusing will be. You will be surprised at the
amount of magnification this magnifier provides.
When designing this device I was expecting the classic
knife edge star image would be magnified making the process of focusing easier.
Now here's where the bonus comes in. When I tried this design out I found
that the clear area of the knife edge hole viewed through the magnifier
is para-focal with the camera film plane.
That is because the magnifier is focused to the knife edge plane attached to
it. When the whole assembly is placed on the film guide rails stars can be
directly viewed and focused as they would be on the film itself. As exact
focus is neared very faint stars 'pop' into view. The effective power of the
17.2mm magnifier through my telescope at 1250mm is 72x.
Focusing is achiefd in just a few seconds. Just rack the focuser until very tiny mag stars pop into
view. I know this is not a 'true' knife edge and variations in focus could
come into play because of the eye's ability to adjust. However, I believe
focusing on the knife edge in daylight minimizes this somewhat because the
bright light allows extra fine focusing on the very edge of the knife edge.
When this is done accurately focusing at night will be easier because the
depth of field will be minimize to near zero and the tiny stars will only
be visible when they are exactly at the knife edge plane. I have never
had a poorly focused image since I started using this device.
If you are interested in making this device and would
like to talk to me about something please feel free to eMail me.
See my Rosette and
OmegaCent images, both were focused in just a
few seconds using this device.

Classic Knife Edge

Update: 2002
I found my Varient Knife Edge focuser above to be suspetable to how tired my eyers are, how tired I am and how well dark adapted my eyes are. Although the Varient Knef Edge Focuser works very well is is not as good "all the time" as a true Knife Edge Ficuser.
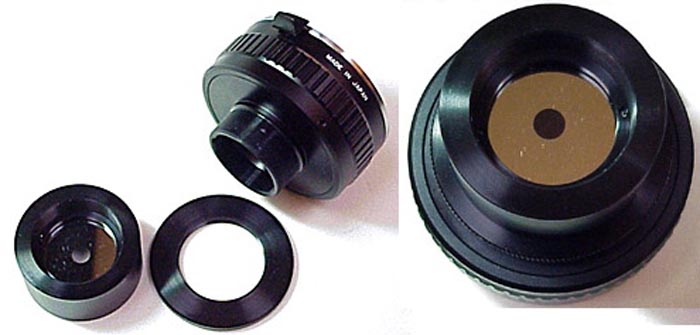
Currently I use a Mitsuboshi Knife Edge Focuser sold by Heutech. This is an excellent KEF although I find it a little limited because the KEF must be calibrated to an individual camera's film plane spacing. Althought the Mitsuboshi Knife Edge Focuser is extremely accurate it cannot be used for another camera without first being recalibrated.

If I had it to do all over again, I still would buy the Mitsuboshi Knife Edge Focuser.